Connect your site to Keyworth
Step by step, per platform. Most people are connected in under five minutes, and once you are, every article Keyworth writes publishes straight to your own site.
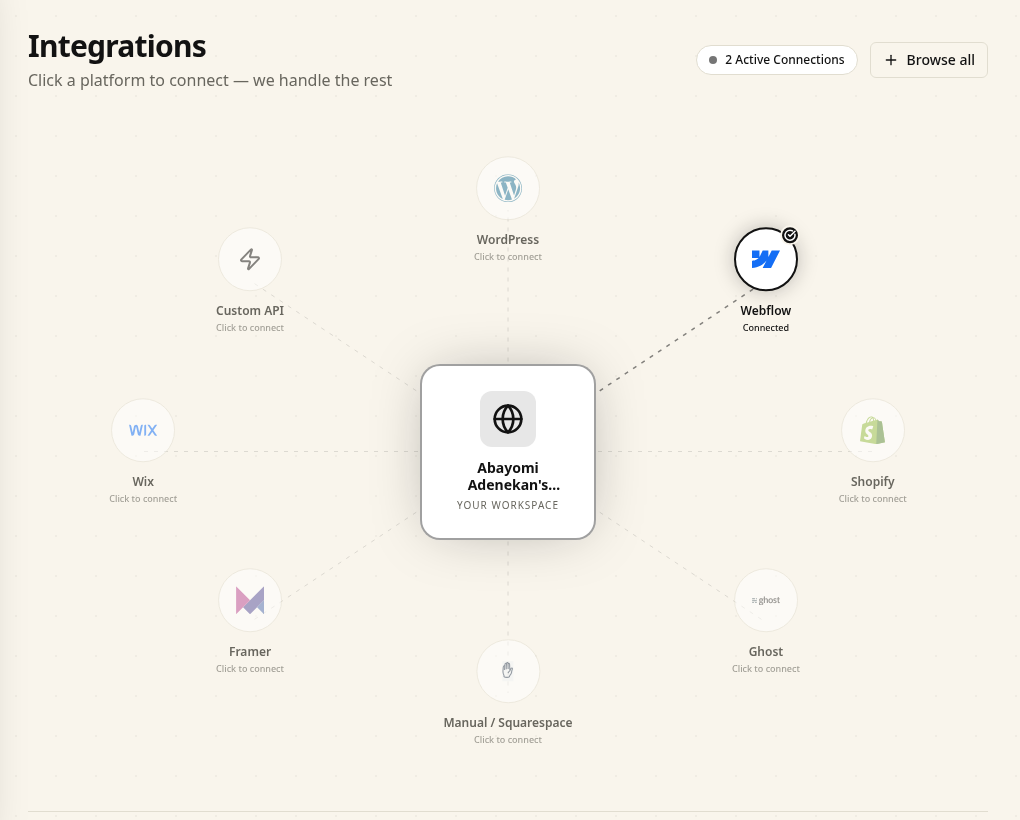
Everything below starts in the same place: Keyworth → Integrations. Click the platform your site runs on and the connection form opens.

WordPress
Publishes automaticallySteps checked September 2026The fastest route is the Keyworth plugin: install it, press one button, and the connection is made for you. If your host or your user role blocks plugin installs, use the manual route below instead. Both end up in the same place.
Recommended: the Keyworth plugin
Before you start
- WordPress 5.6 or newer, served over HTTPS
- An administrator login on the site
- Permission to upload a plugin
- 1Download the plugin: keyworth-wordpress-plugin.zip
- 2In WordPress, go to Plugins → Add New Plugin → Upload Plugin, choose the file and press Install Now, then Activate.
- 3Open Settings → Keyworth and press Connect to Keyworth.
- 4You are sent to Keyworth. Sign in (or sign up) if you are not already, then pick the project this site belongs to and confirm.
What it looks like when it worked
- • Settings → Keyworth shows Connected, with the date and your Keyworth project name.
- • In Keyworth, the WordPress tile on Integrations shows a green Connected badge.
- • Your next scheduled article appears on your blog by itself, no copy and paste.
Fallback: connect manually with an Application Password
Before you start
- WordPress 5.6 or newer, served over HTTPS (Application Passwords are disabled without it)
- Your WordPress login username — not your email address
- A user role that can create posts (Editor or Administrator)
- 1In WordPress, go to Users → Profile and scroll to Application Passwords.
- 2Type a name such as Keyworth and press Add New Application Password. Copy the 24 character password that appears — it is shown once only.
- 3In Keyworth, open Integrations → WordPress.
- 4Fill in the site URL (the root address, for example
https://yoursite.com, with no/wp-json), your username, and the password you just copied. - 5Press Connect. Keyworth checks the site straight away and tells you if anything is off.
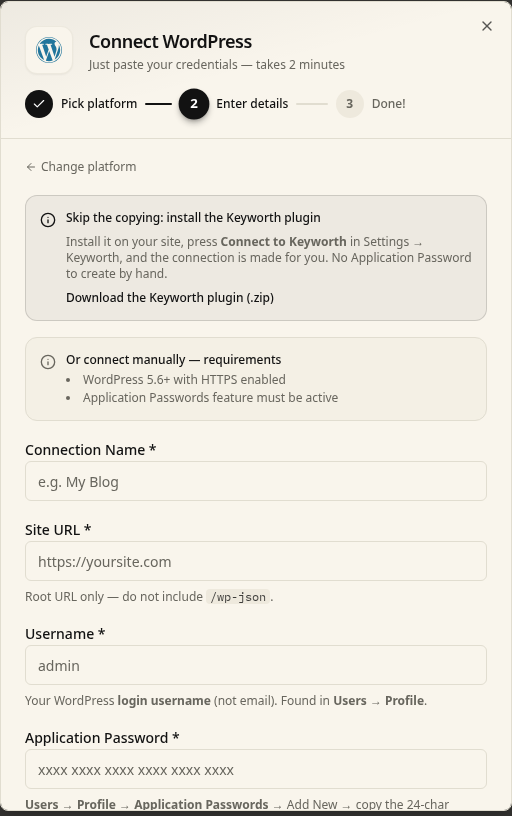
What it looks like when it worked
- • The connection saves without an error and the tile turns green.
- • The connection card lists your site address underneath the name.
- • Publishing a test article puts a real post on your blog within a minute.
When it goes wrong
Plain permalinks silently break publishing
If Settings → Permalinks is set to Plain, WordPress serves a web page where Keyworth expects an API reply, and posts quietly fail to appear. Switch to Post name and press Save Changes. Keyworth now falls back automatically in most cases, but Post name is the setting you want anyway — it also gives you clean URLs.
"Could not connect" or the address is rejected
Check the address opens in a browser exactly as typed, including https:// and the www or lack of it. Expired domains and staging sites that have moved are the usual culprits.
The password is refused
Use the Application Password, not your login password, and paste it with the spaces exactly as WordPress shows it. Security plugins and some managed hosts block the REST API — ask your host to allow /wp-json/wp/v2, or use the plugin route.

Webflow
Publishes automaticallySteps checked September 2026Before you start
- A Webflow site with a CMS Collection for blog posts (a plain static page will not work)
- Workspace permission to create an API token
- The collection needs, at minimum, a name field, a slug field and a rich text field for the body
- 1In Webflow, go to Account Settings → Integrations → API Access and generate a new token with read and write access to CMS.
- 2Copy the token. Webflow shows it once.
- 3In Keyworth, open Integrations → Webflow and paste the token.
- 4Choose the site, then the Collection your blog posts live in.
- 5Match the fields: which Webflow field holds the title, the body, the summary, the main image. Keyworth suggests matches and you confirm them.
- 6Save. Keyworth writes a test item to confirm the mapping is accepted.
What it looks like when it worked
- • The Webflow tile shows Connected and names the collection it is publishing into.
- • New Keyworth articles appear as CMS items in that collection, already published.
- • Images, summary and slug arrive filled in, not blank.
When it goes wrong
The token has no CMS write access
A read-only token connects but never publishes. Regenerate it with CMS write enabled in Account Settings → Integrations → API Access.
Posts appear but pages do not update
Webflow needs the site published for new CMS items to appear on the live domain if your collection template was changed since the last publish. Press Publish in the Designer once.
A required field is not mapped
Webflow rejects an item that misses a required field. Either map it in Keyworth or make the field optional in the collection settings.

Ghost
Publishes automaticallySteps checked September 2026Keyworth publishes through the Ghost Admin API using a custom integration key, which takes about two minutes to create inside Ghost itself.
Before you start
- A self-hosted Ghost site or a Ghost(Pro) account
- Access to the Ghost admin area
- Your site address, for example https://blog.yoursite.com
- 1In Ghost admin, go to Settings → Integrations and press Add custom integration.
- 2Name it Keyworth and save.
- 3Copy the Admin API key that appears — it looks like two long strings separated by a colon. Do not use the Content API key; that one is read-only.
- 4In Keyworth, open Integrations → Ghost.
- 5Enter your Ghost site address (the root, no
/ghoston the end) and paste the Admin API key. - 6Press Connect. Keyworth checks the key against your site straight away.
What it looks like when it worked
- • The connection saves without an error and the Ghost tile shows Connected.
- • Your next scheduled article appears in Ghost admin under Posts, already published.
- • The post carries its SEO description and featured image, not just the body text.
When it goes wrong
The key is refused
Make sure you copied the Admin API key from Settings → Integrations, not the Content API key shown on the same screen. The Admin key contains a colon; the Content key does not.
The address is rejected
Use the address your readers see, exactly as it opens in a browser, including https://. If your Ghost lives on a subdomain such as blog.yoursite.com, enter that full subdomain.
Posts save but do not go live
Keyworth publishes posts directly. If they appear as drafts, check that the integration was saved with a fresh Admin key — a rotated or deleted key can still authenticate reads but fail writes.

Shopify
Publishes automaticallySteps checked September 2026Keyworth publishes to your Shopify store's blog through a custom app token, created once in your Shopify admin.
Before you start
- A Shopify store with staff access to create apps
- Your store address in the form mystore.myshopify.com
- An existing Blog under Online Store → Blog posts
- 1In Shopify admin, go to Settings → Apps and sales channels → Develop apps and press Create an app. Name it Keyworth.
- 2Open Configuration → Admin API integration and enable the write_content and read_content scopes, then save.
- 3Press Install app, then open API credentials and copy the Admin API access token — it is shown once only.
- 4In Keyworth, open Integrations → Shopify.
- 5Enter your store address (for example
mystore.myshopify.com, not your public domain) and paste the token. - 6Press Connect. Keyworth finds your blog and confirms it can publish to it.
What it looks like when it worked
- • The connection saves without an error and the Shopify tile shows Connected.
- • New articles appear under Online Store → Blog posts as published posts on your blog.
- • The post keeps its SEO title and description in Shopify's search engine listing.
When it goes wrong
The token is refused
The Admin API access token is shown once when the app is installed. If you lost it, uninstall the app in Settings → Apps and sales channels → Develop apps and create it again — a new token is generated on reinstall.
"No blog found"
The store has no blog yet. In Shopify admin, go to Online Store → Blog posts → Manage blogs and create one, then reconnect in Keyworth.
Wrong store address
Use the .myshopify.com address, not your custom domain. You can find it under Settings → Domains — it is the one Shopify lists as your primary myshopify domain.
Custom API — any other site
Built and testedSteps checked September 2026If your site is custom built, on a framework, or on a platform we do not talk to directly, Keyworth can post each article to an address you control. You add one small endpoint once, and everything after that is automatic.
Before you start
- Somewhere you can add an HTTP endpoint — your app, a serverless function, or your CMS's own API
- A developer for the first fifteen minutes (Keyworth gives you the code to paste)
- An address reachable from the public internet
- 1In Keyworth, open Integrations → Custom API.
- 2Copy the ready-made receiver code shown in the dialog, and deploy it on your own site. It accepts the article, checks a secret and saves the post.
- 3Copy the shared secret Keyworth generates and set it in your environment as
BLOG_PUBLISH_SECRET. - 4Paste your endpoint address back into Keyworth and save.
- 5Keyworth sends a harmless test call first — one that writes nothing — to prove the address and secret line up.
What it looks like when it worked
- • The test call succeeds and the tile turns green.
- • Your endpoint receives title, slug, body HTML, meta description, images and tags.
- • The post URL you return is stored, so Keyworth links future articles to it internally.
When it goes wrong
401 unauthorized on the test
The secret in your environment does not match the one shown in Keyworth. Copy it again and redeploy — a trailing space is the usual cause.
The test writes a blank post
Your endpoint must treat a body containing ping: true as a check and return success without saving anything.
Articles publish but never show a URL
Return { post_url } (or url) in your response, so Keyworth knows where the article landed.
Squarespace
Guided manual publishSteps checked September 2026Squarespace has no API for creating blog posts, so nothing can publish to it automatically — not Keyworth, not anyone. What Keyworth does instead is hand you each finished article pre-formatted, so publishing is a short paste rather than a rewrite.
Before you start
- A Squarespace site with a Blog page
- Two or three minutes per article
- 1In Keyworth, open Integrations → Manual / Squarespace and save it as your publishing method, so the app stops nudging you to connect an API.
- 2When an article is ready, open it and press Export.
- 3In Squarespace, go to your blog page and add a new post. Paste the title, then the SEO description into Post settings → SEO → SEO Description.
- 4Add a Code block via Insert → Code, set it to HTML, and paste the body HTML from the export.
- 5Download the images from the export and upload them: the main one as the post thumbnail, the rest into the body where the export shows them.
- 6Publish in Squarespace, then press Mark as published back in Keyworth so your reporting stays accurate.
What it looks like when it worked
- • The post shows headings, lists and links, not a wall of raw tags.
- • The article shows as Published in Keyworth with its live address stored.
- • Your search description in Squarespace matches the one Keyworth wrote.
When it goes wrong
The HTML shows as text
The Code block is set to Markdown or CSS. Open the block settings and set the type to HTML.
Images do not load
Upload them into Squarespace rather than relying on the original links, then swap the image address in the pasted HTML.
Keyworth still says the article is scheduled
Press Mark as published in the export dialog once the post is live. Nothing else can tell Keyworth it happened.
Other platforms
Wix and Framer — use the Squarespace route
Neither can be published to automatically today, so there is no connection worth walking you through. Use the guided manual export above instead: the article arrives finished and you paste it in.
Connect once. Then stop thinking about publishing.
Keyworth researches the keywords, writes the articles and puts them on your site on schedule. Start free, no credit card.